Search This Blog

Monday, November 11, 2013

Tigo Energy Maximizer


Tigo Energy Maximizer

So I've finally got my Tigo system working.  It took a while for Greenspring Energy to get it running.  Part of the issue was that there was a communication issue with 2 (of 6) panels.  This communication issue for some reason meant that TIGO would not generate my login information.  That also confirmed a suspicion I had after I was watching the inverter (before Tigo and TED) only produce ~1.1 kW of power on a beautiful cloudless sunny day.  Once the communication issue was fixed (Greenspring sent over 2 technicians to diagnose and fix) the system was up and running at nearly maximum potential.  And I could finally login to Tigo.

So...why Tigo?  Well, long story short, Tigo was an alternative to microinverters such as Enphase.  It essentially allows each panel to operate individually such that if there was any shading (i.e. trees, squirrels, random cloud) then it would only affect that panel and not the entire string.  My two pics below show how the TIGO is allowing my system to have panels operating at different powers which is maximizing my power output.

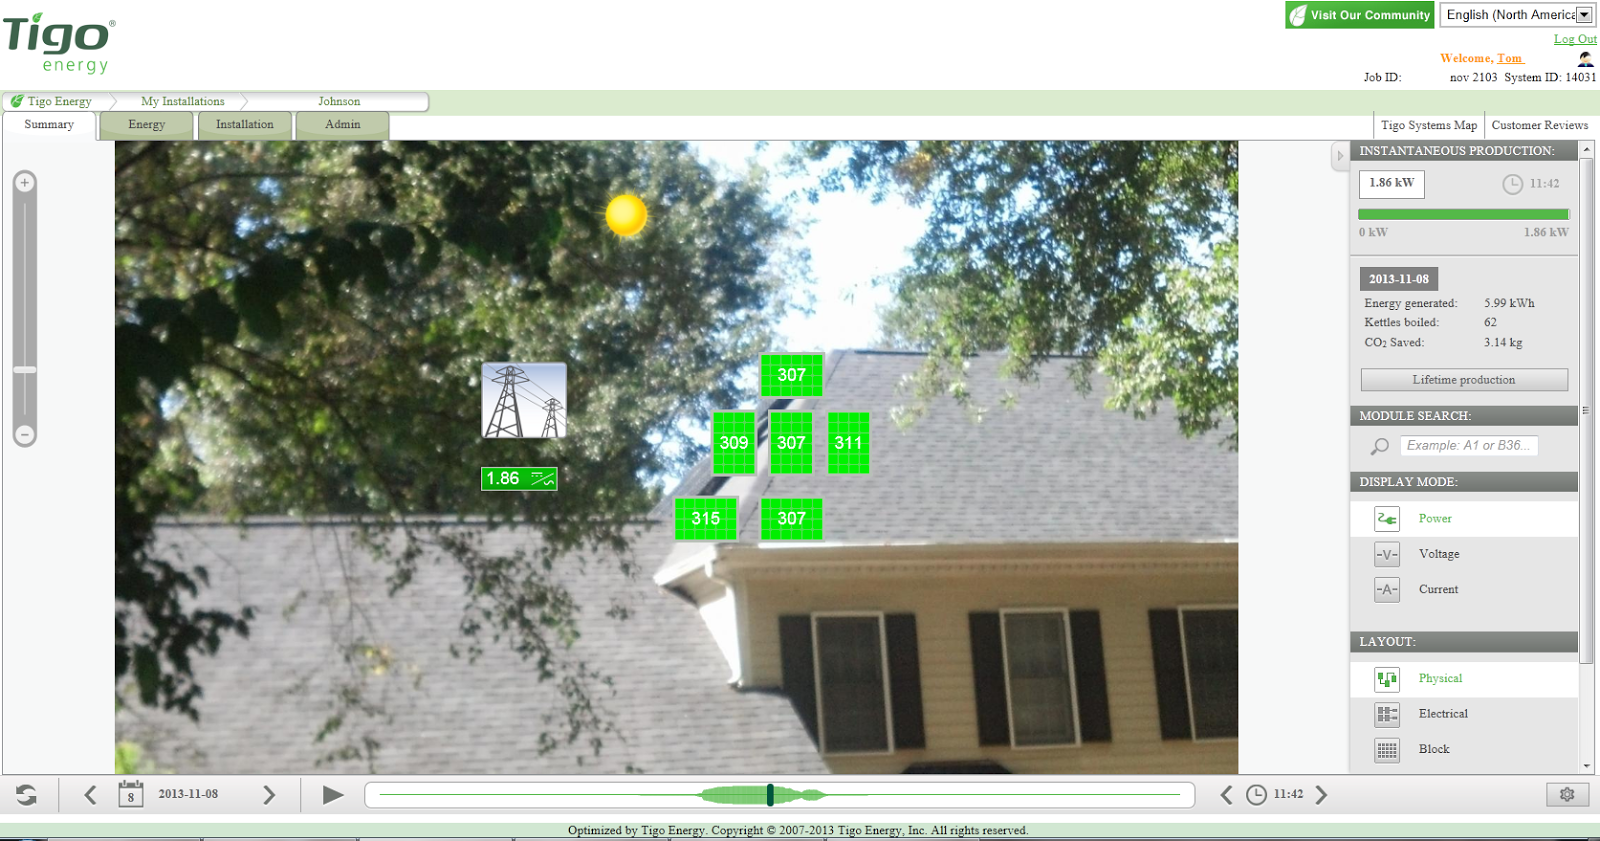
Tigo online information (no shading).  System is producing 94.8% of its max potential. 

Tigo online information showing one panel shaded.  Without Tigo, I would have been producing 474W instead of 1,510W
***WARNING***
***NERDY ELECTRICAL ENGINEERING LESSON STARTING NOW***
Why is that?  Well...solar panels are wired in series.  So on one 300W panel, for instance, let's say we have 60 individual solar cells.  Each one of those cells, at optimal conditions would produce 5W such that 60 x 5W = 300W.  Well, because they are wired in series, if one cell becomes partially shaded and only produces 1W, then due to the bottle-neck, ALL the cells will only produce 1W (1W x 60 = 60W).  It doesn't matter if that cells is the first cell or the last cell in the series...then will all be bottle-necked.  And the same goes for hooking up multiple solar panels.  Bummer, huh?

The reason they do this is just the laws of electricity (I know there's a better name, but I don't have time to look it up).  So Power = Voltage x amperage.  Well for the same power, if you hook everything up in parallel, then the voltage remains constant.  Thus as you add more 'power', then the amperage must go up.  Alternatively, if you install everything in series, the amperage stays the same and thus, as power goes up, voltage goes up. 

So why not hook up panels in parallel?  Well...the more amperage you have the larger the wire you need to have.  Ever look in your breaker box?  Check out the varying size of the wires.  The wires that enter the box from your electricity meter are HUGE (200 amps, 240V) compared to those that exit and go to, say, a normal outlet (120V, 15amp).  Well...think about that for each solar panel.  Those wires cannot be 'fished' easily through walls or down conduit.  And those wires are expensive because there's a lot of copper in them.  See the following table (sorry for the headings not lining up with the rows...not sure why it copied that way).  Most likely your house is fed using either and 2/0 or 3/0 AWG cable while a normal circuit in your house is probably a 10 or a 14 AWG.

AWG
 Diameter 
inches
mm
Area
[mm2]
Resistance
Ohms / 1000 ft
Resistance
** Ohms / km
 Max Current
***
Max Frequency
for 100%
skin depth
0000 (4/0) 
0.46
11.684
107
0.049
0.16072
302
125 Hz
000 (3/0)
0.4096
10.40384
85
0.0618
0.202704
239
160 Hz
00 (2/0)
0.3648
9.26592
67.4
0.0779
0.255512
190
200 Hz
0 (1/0)
0.3249
8.25246
53.5
0.0983
0.322424
150
250 Hz
4
0.2043
5.18922
21.2
0.2485
0.81508
60
650 Hz
6
0.162
4.1148
13.3
0.3951
1.295928
37
1100 Hz
8
0.1285
3.2639
8.37
0.6282
2.060496
24
1650 Hz
10
0.1019
2.58826
5.26
0.9989
3.276392
15
2600 Hz
14
0.0641
1.62814
2.08
2.525
8.282
5.9
6700 Hz

Well a 10 AWG wire might be $1/ft at Lowes while a 2/0 AWG wire is $6.50/ft.  That's a big cost difference if you have to run a wire 100-ft to get from the roof to your breaker box.  And at 0.50" DIA try bending that 2/0 wire to get around a corner. 

Just doing the math, using the pic above where the panels were producing 1.86 kW, that's roughly 310W/panel or 52V @ 6amp.  Running in series, that's a 6amps and 310V using a 10 AWG wire.  Running in parallel that's 52V @ 36 amps which would require a 4 AWG wire.

OK...enough of the electrical engineering lesson.  Hopefully it was semi-informative even though it was basic.


Friday, November 8, 2013

Too much excitement not to share...

Screenshot from my TED5000

OK...so this week I received my extra TED5000 MTU and clamps and installed them so I can finally see what I'm producing.  It took me a bit to figure out how to get it setup appropriately though.  Once I installed the unit and checked with the software, all my readings went negative (it was 8pm at night...no sunshine). I double checked my installation and it was all appropriate.  Then I read in the forums, that I needed to removed and flip the clamps on the 'whole house' wires and that did the trick.  Once I did that then the readings were all correct.  Then, it was cloudy.  Dang!  Well, today the sun is shining brightly and I'm finally getting to see my system producing power (I knew it was, but now I can see it remotely).  Yes...I am a nerd.

From the screenshot above (11am EST) my system was producing 1.702kW while peak production is 1.962kW while I was only using about 100W, so I'm sending power to the grid, baby!  

Sometime today I should get my login information for TIGO and I'll post on that.  I'll save that saga for another post, but long story short, there was a communication error from 2 of my panels (~660W NOT producing) and Greenspring energy had to send out a technician to fix it (all panels are now producing power).  With that fixed, TIGO can communicate and I'll be able to view the real time info on each panel.  

Monday, November 4, 2013

Energized!


View of my solar panels
So my panels are up and running.  Last Thursday the folks came out and flipped the switch to start producing power.  And of course it had to be an overcast day.  And the next day it rained.  Such a bummer.  However, last weekend (and today) the sun is shining and I'm producing some power!  I checked it multiple times this weekend and I myself producing about 1.1 kW of power. Cool!

Zero Watts.  So disappointing...
The Tigo system is hooked up as well.  I can't say much about it because I still haven't gotten my login information so I can view what's going on.  And the unit at my house won't give me any information until it connects with their servers online.  What a drag!  Greenspring told me this was supposed to be done Thursday and I'd get the login information on Friday.  Well...it's Monday and still nothing.

Tigo Unit not telling me anything.  Boring...
Overall, I'm happy with the install.  That being said, I have a couple of critiques for Greenspring Energy:

1)  Be honest with the payback.  They gave me the information from PVWatts, install costs, and then estimated an ROI.  Here's what they didn't provide:
    a)  No Tax was included.  That was another ~$500 on top of the install cost.  $500 is roughly 2 years on the ROI.
    b)  Be realistic with the Duke Energy rate increases.  They used 5%/yr.  Yeah...that works for the last, oh 5 years.  But long term, it's been closer to 2%/yr.
    c)  If you conduct a solar eye, then adjust your power generation numbers! I had to ask if they did a solar eye and then ask for the results.  When I read the results, I found out that the actual estimate for power was 20% lower than what PV Watts was estimating, because it assumes an unimpeded ideal southern exposure.  I don't have that.
   d)  Solar panels degrade.  It's even one of the selling points by Sunpower...that it retains ~95% of its power after 5 years and 85% after 25 years.  That's a 0.25%/yr degradation (industry standard = 1%/yr).  Fantastic...well you gotta include those calculations in your ROI!  
   e)  Overall, my ROI was estimated at 13 years.  There's was much better.  Anybody Surprised?
   f)  Hopefully this changes, as I showed them the U.S. DOE System Adviser Model (SAM).  This model includes all the information I note above (except rate increases as user entered).

2)  I would've thought a high priced install would have looked nicer?  The panels themselves look nice\, but some of the other aspects could have been more professional looking.
  a) Below are some pictures with the install.  I'm a little disappointed that I now have a long conduit pipe running down the side of my house.  I will say that at least it's kind of hidden as it runs along the soffit. I'm probably going to have to paint it so it will blend in a little better.  Granted my breaker box isn't exactly located in the easiest place to get at. But, I will say that the wires could have been run down to the crawl space and then come out to the inverter.  I can't complain too much about it.  It definitely could have looked worse.  Judge for yourselves:
Conduit running along the side of the house to the inverter
  b) Next is the TIGO install.  Check out the wires.  Looks like of sh*tty, right?  When they were there I inquired about the wiring and they were offering to get one of those cheap-o black cord holders.  Appropriate thought, I'll give them credit.  But seriously...make it look nice.  Thus, why I went and purchased the nice wire hiding stuff.  And I may go further and have it go into the wall first, and then pop out and run along the base.  I'm not sure yet

Tigo wiring At least they put on wire ties, right?


Then there's where they came through the wall to hook up the communication to the panels via ethernet (gray wire). They ran it through the upper attic, then down to the bonus room attic knee wall (like I did when I wired the house for ethernet).  However, they just cracked my base plate and ran their wire behind mine.  Really?  You couldn't spend the $2 to buy a new plate to run it through?  And then in my bonus room attic, I spent a lot of time and effort putting up XPS insulation and sealing everything.  They just drilled a hole and ran the wire through...leaving a direct hole from the attic to my bonus room.  Couldn't even take the time to put at least piece of HVAC tape over it?!? (I did that temporarily)  Well...once I get the wire chase installed, I've already bought the new plate with the hole where I'll have the wire will run through.  And when that's done, I'll fill in the hole with the XPS with great-stuff foam.  I think I may still have ethernet materials left over....and if I do I may install an ethernet jack instead to make it look much more professional.

Wire coming through the back of the plate.

Once I get the TIGO login information, I'll post about it.  It's pretty cool stuff.

Oh...and I had to buy another adapter kit for my TED 5000.  Apparently it won't register less than zero...or I should say when it does it still reads a positive value.  So to correct my TED readings, I've had to spend $100 on a new MTU (transmitting unit) so I can measure the PV generation individually and then TED will subtract those values from my overall to give me a net (+/-) value.  I'm a little disappointed in this, but oh well.  I should have looked this up previously.

Stay tuned for more fun info!